A little over a week ago a friend of mine that knows I track planes called me up to tell me he saw the Goodyear Blimp flying over Livermore. When I got home I went to my Pi-aware flight tracker to see if I could spot anything. Nope- nothing was on the current map and my logs didn't have any hits for the ICAO numbers Goodyear has registered with the FAA (their blimps have tail fins N1A to N7A). While I was disappointed, I wasn't too surprised- the one time I did see a blimp on the tracker it wasn't providing position info. I figured the one my friend saw had already landed, and that my logs weren't observing it because I only record planes with positions.
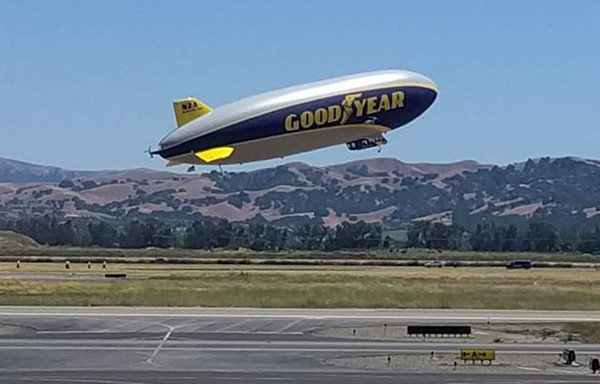
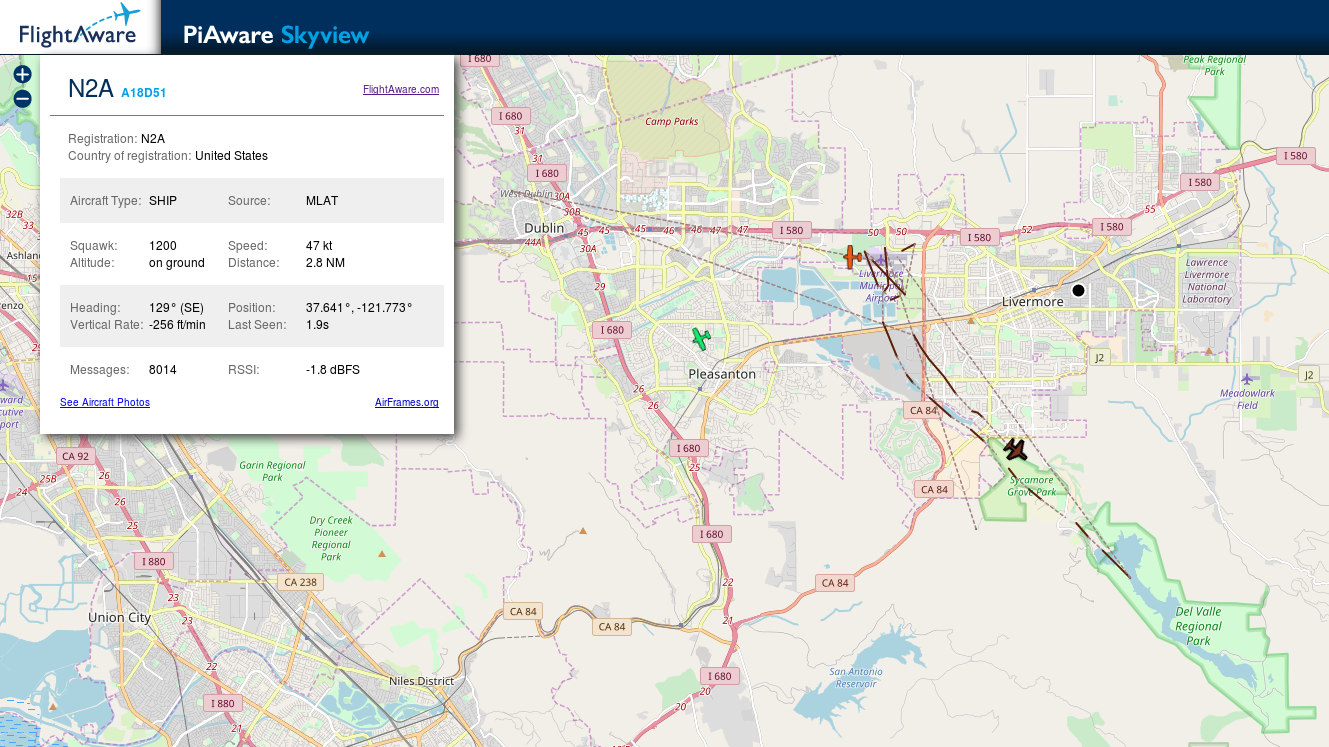
I had the following Friday off so I took some time to poke around a little more. I found someone had posted a video on youtube showing blimp N2A landing in Livermore earlier in the week. That helped me figure out which ICAO id to look for (N2A is A18D51). Amy called to let me know that she'd spotted it while she was driving to Dublin. I checked the tracker again and got a nice surprise- in addition to picking up its transmissions, there were enough pi-aware users in the area to determine its location via MLAT. So far the tracker always reports the blimp's altitude as being "on ground". Flight Aware says its somewhere between 1000 and 2000 feet. I've read that blimps are hard to track because the low altitude makes it difficult to get enough stations with line of sight to do the MLAT. I don't get much range with it- it disappears once it's out around Dublin.
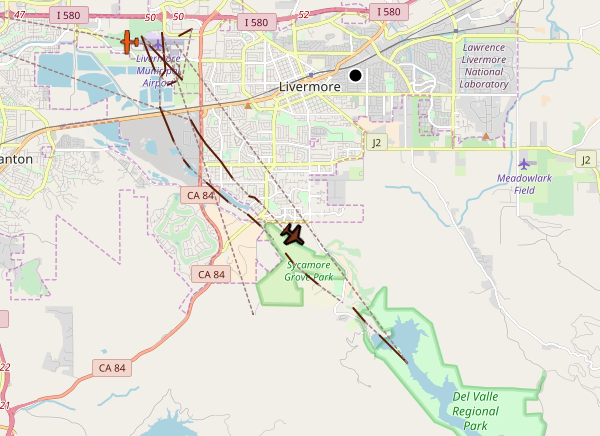
I don't have a good idea of what it's doing out here. Usually the blimp comes out here for sporting events. The Warriors/Cavs championship games started this week, but they're in a closed coliseum. I guess the Giants and A's also have some home games this week. It's definitely been hanging around Livermore a lot though. On the way home from lunch today we stopped at the Livermore airport and watched it land, swap out people, and then take off again. From the tracks I captured it looks like they made a few trips out to Lake Del Valle and back. It was 90 today, so there were probably a lot of people out there cooling it off. It's funny having a giant blimp hanging out in our little town for so long. It's like a giant puppy wandering all over the place.
It's taken more than a half year to get back to it but I finally mounted the antenna on the roof. The main problem was that the mount kit they provided was a little small for the pipes I wanted to use on the roof. I wound up buying new u-bolts and cutting my own bracket plates to make it work. It's a little hacky but so far it's stayed put. I also had to buy some longer (LMR240) cable to get to the PI in the garage.
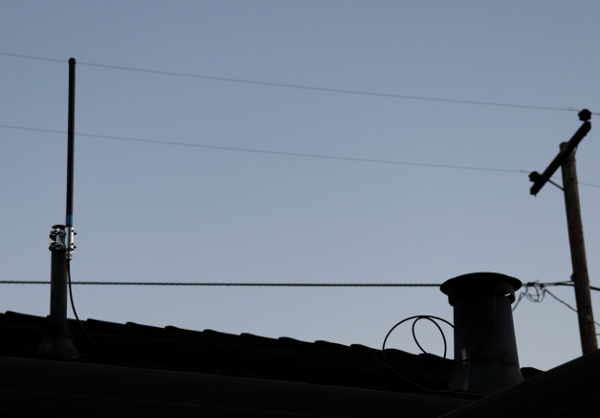
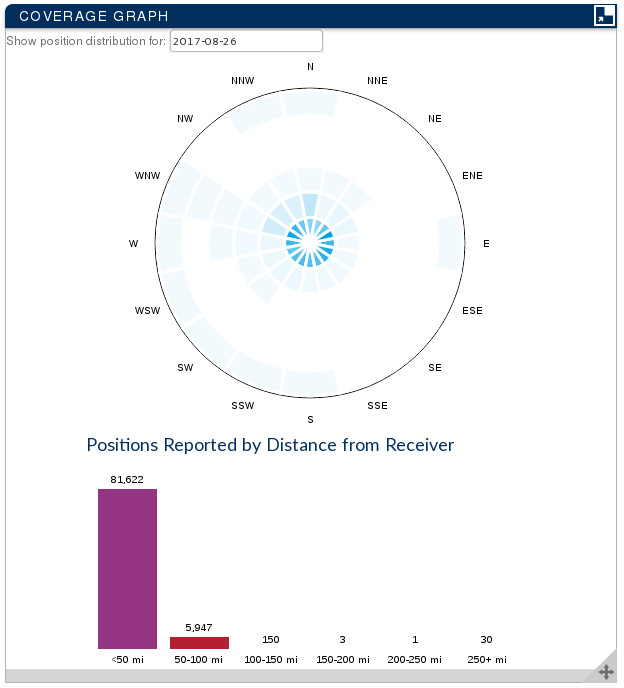
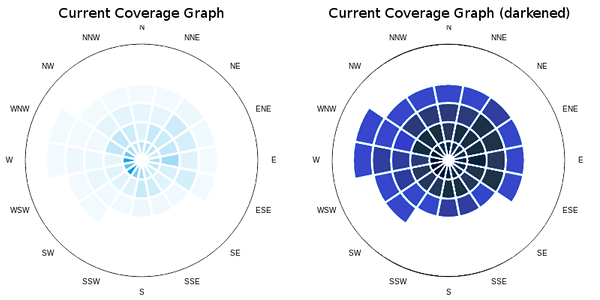
Moving the antenna outside of the garage seems to have had a positive impact on my reception. As the coverage maps show below, I'm seeing a good distribution of planes in all directions, though I'm missing a notch towards the south. The antenna is on the north side of the house and below the top of the roof, so it's likely the roof is interfering.
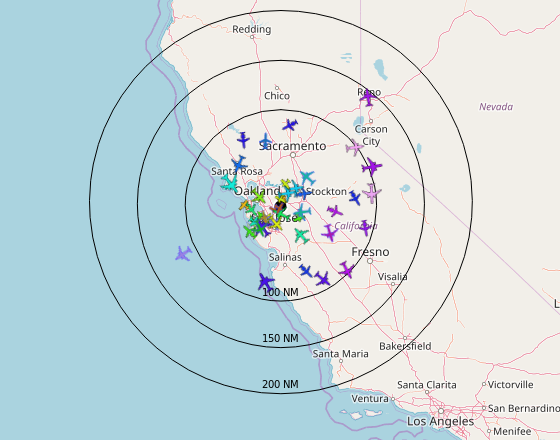
I'm pretty happy with the range, though. I see a lot more planes in the 150-200mi range now, and even a handful of planes 200-250mi away (usually international flights coming in over the Pacific). Previously, I used to lose planes around Sacramento. Now they disappear around Reno.
I'm going to be traveling to Knoxville, Tenseness in about a week to go to a big all hands meeting for the Exascale Computing Project. While Knoxville seems like a fun city, I'm dreading the travel because of the time change and the difficulty in flying there from the Bay Area. Knoxville's Airport is tiny and doesn't have many flights from this side of the country. Last year when I went to ECP my SJC to ATL flight was delayed and I was lucky to get the last seat on the last plane for the night (I had visions of renting a car and driving from Atlanta to Knoxville in the middle of the night).
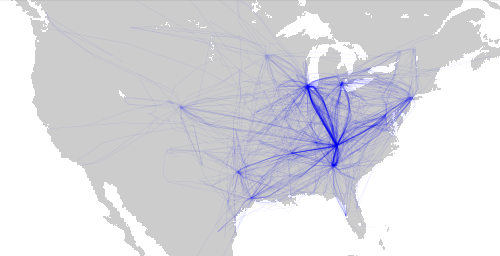
While making a poster for this trip, I started thinking it'd be fun to use some of the airplane flight data in an example for Kelpie. I dusted off my datasets, learned the basics of Boost's Geometry library, and wrote some simple C++ examples that digested and analyzed my data. I then wrote a simple tool to identify flights that landed at a particular airport, and then dumped the entire day's track for those planes. The idea was that I wanted to know how far I could get from an airport without changing planes. I plotted the data in matplotlib using the plotting tool I wrote a while back.
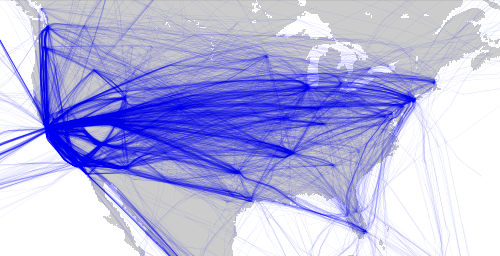
As the plots show, you don't have many options if you want to go west from Knoxville. I didn't put it on the poster, but if you wanted to minimize travel pain for this conference and host it near a national lab, the right place to do it is at Argonne near Chicago. They have massive direct flights and are at least closer to the middle of the country. However, Chicago on February doesn't sound like the best idea to me.

Not to sound like an obsessed nut, but I went out and bought a special antenna for capturing airplane data. Specifically, I bought the FlightAware 1090MHz ADS-B Antenna from Amazon. Heh. I didn't look too closely at the pictures and thought it would be walkie-talke antenna size. When a three foot long box arrived with a 26 inch antenna, I realized the coax connector in the picture was actually a large N coax connector instead of the tiny SMA connector I had in mind. I didn't have the right connectors, so I had to order a special cable to try the antenna. The initial tests of the antenna inside the house were good (saw a few flights beyond 100 Miles), but naturally I wondered how well it would do outside the house.
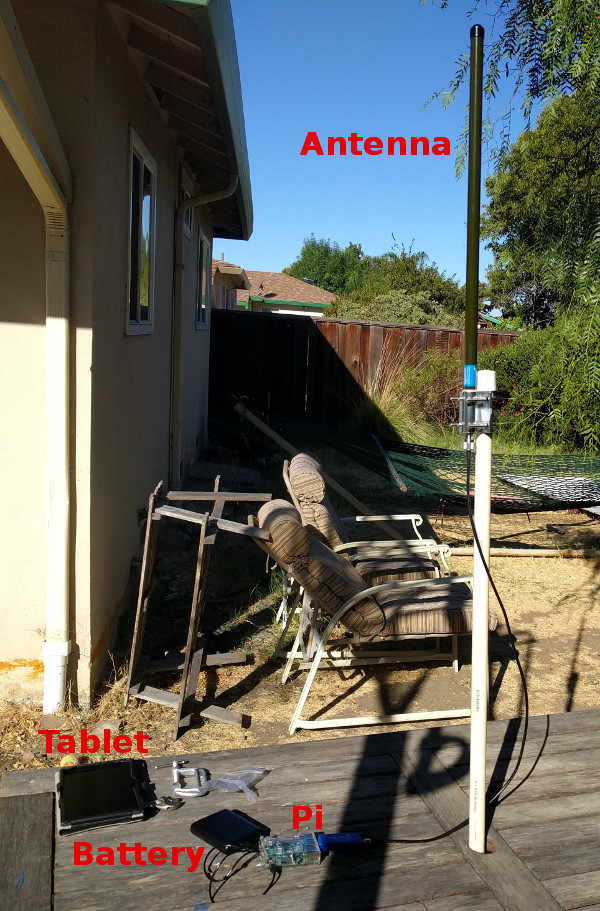
One of the nice things about working with the Pi is that I can just hook it up to a USB battery pack and take the thing wherever I want. This turned out to be great for testing the antenna. I attached the antenna to some PVC pipe, cabled it into the battery-powered Pi, and then duct taped the whole thing to the top of a ladder. While the whole thing was wobbly, I could pick up the ladder and drag it to different spots in the back yard. I'd then go to the Pi's web page from my tablet and watch the map to see how many planes I was getting.
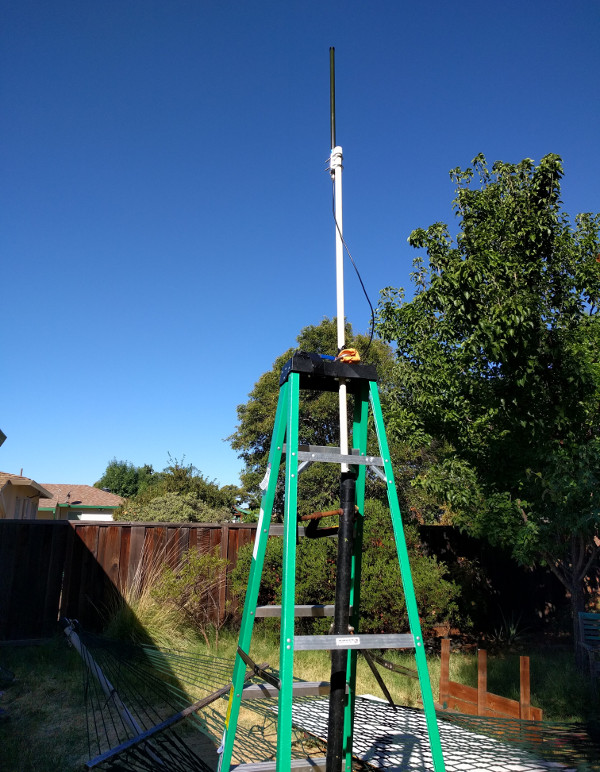
I wasn't very rigorous about the tests, but it seemed like I got better performance when I moved the antenna from our patio to the back yard. The results seem logical because on the patio the house is still in the way of most of our air traffic (which is west and south). The downside of all this is that there isn't a good place to mount the antenna (or route its cable) on the back of the house. Plus my wireless network evaporates a few feet into the backyard. In any case, I'm going to put the antenna and the Pi in the garage for now, until I get more time to mount it properly up top.
It's been almost half a year since I got fed up with the Intel Edison and decided to switch over to the RaspberryPI. Most of that time I've just been tinkering with it, doing things like check out RetroPI, hooking up simple led circuits, and using the built-in tools to get the kids interested in programming. The main thing I've wanted to do is get dump1090 running, but I haven't been too motivated to do that since the setup I have on Edison just works. A few weeks ago I downloaded the PiAware disk image from FlightAware.com and got everything running on a Pi3 board (w/ RTL-SDR dongle). I registered my box with them and you can now go to their web page to see my statistics.
FlightAware Online Visualizations
FA has several interesting visualizations, including the above position histogram to help you figure out where your traffic is. From the above I can see that most of the planes I catch are within 50 miles from me, and that planes that are farther out usually are North-West of me. The plot also shows I'm still getting some oddball points more than 250 miles away. The last time I looked at these points I found that they must be corrupt values (usually one bad lon or lat).
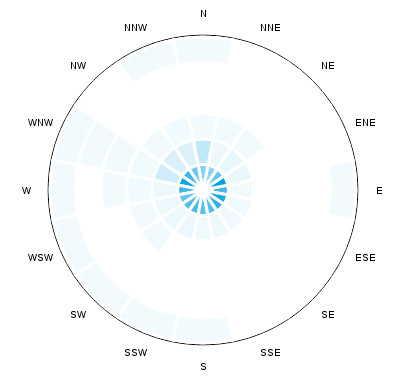
One of the cool things about using FA is that I can compare my stats to other people that are close to me. Right now there are 11 other people that are within 10 miles of me. If I make an antenna change I can look at my neighbors to see if I'm catching the same planes as them. Just eyeballing the data it looks like my antenna (which is directional and pointed at Sutro Tower in SF) is missing all kinds of flights to the south of me. Also, one or two of these people are getting nearly double the flights I am.
MLAT: Using the Crowd to Find the Unfindable
The coolest feature of using FA though is that your PiAware box can work with other PiAware boxes in the area to estimate the positions of planes that aren't transmitting their coordinates. A pet peeve of mine is that many planes have ADS-B hardware, but they don't transmit their locations because they want to have some privacy (never mind that they're buzzing over my house, peering into my backyard). PiAware has a mulilateration (MLAT) capability you can enable to find planes based on time differance of arrival (TDoA) information from four receivers. Basically, if four PiAware receivers hear the same message, they can use the position info for the receivers and the delay each of them reports for receiving the message to triangulate the plane. While it means you have to register your receiver's position with FlightAware and spend some network bandwidth transmitting data, many of those unknown planes get tagged.
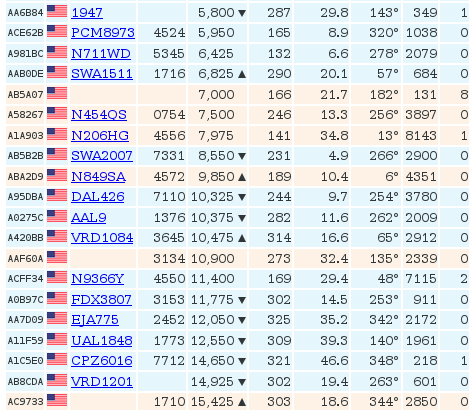
Above is a snapshot of some of what the dump1090 webpage looks like now with mlat on. All of the tan (?) entries are planes that were tagged with mlat. It's very satisfying to see the added entries. Previously, it seemed like half of the planes were annonymous.
PiAware Setup
The PiAware setup was pretty straightforward. I just downloaded the image and wrote it out to a microsd card, and then updated settings at boot. They consolidated configuration options (eg, wireless network settings, receiver settings, etc) into a file called /boot/piaware-config.txt. It's a little odd to put config options in /boot, but it works ok since this is an appliance. I checked and the system will automatically try to reconnect to the network if it isn't available. That'll be handy when I want to run this fulltime, but shutdown my network link at night. I need to port my ADS-B logging scripts over to this platform (and update them to pull the mlat data), but that's a job for later.